#Xcode 11.5
Explore tagged Tumblr posts
Visit Tumblr Blog
Explore Tumblr blogs with no restrictions, modern design and the best experience.
Last Seen Tumblr Blogs


Fun Fact
The Tumblr app for Google Glass was released on May 16, 2013.
Text
Os X 12 Download

This directory contains binaries for a base distribution and packages to run on Mac OS X (release 10.6 and above). Mac OS 8.6 to 9.2 (and Mac OS X 10.1) are no longer supported but you can find the last supported release of R for these systems (which is R 1.7.1) here. Releases for old Mac OS X systems (through Mac OS X 10.5) and PowerPC Macs can be found in the old directory.
Os X Version 12 Download
Mac Os X 12 Download
The additional components needed to install mac os x can t be found. Note: CRAN does not have Mac OS X systems and cannot check these binaries for viruses.Although we take precautions when assembling binaries, please use the normal precautions with downloaded executables.
Resident Evil 7 Biohazard Mac OS X – GOLD EDITION for Mac. Resident Evil 7 Biohazard Mac OS X This is the 9th title in the Resident Evil franchise and brings back focus on the horror-survival theme. Download OS X Lion for Mac free. Important Note: OS X 10.7 Lion has been replaced by OS X 10.8 Mountain Lion.
Os X Version 12 Download
Install older OS X onto an external drive. The following method allows you to download Mac OS X Lion, Mountain Lion, and Mavericks. Start your Mac holding down Command + R. Prepare a clean external drive (at least 10 GB of storage). Within OS X Utilities, choose Reinstall OS X. Select external drive as a source. Enter your Apple ID. Testing conducted by Apple in October 2020 on production 1.4GHz quad-core Intel Core i5-based 13-inch MacBook Pro systems with 8GB RAM, 256GB SSD, and prerelease macOS Big Sur. Systems tested with WPA2 Wi-Fi network connection while running on battery power, with display brightness set to 12 clicks from bottom or 75%.
Package binaries for R versions older than 3.2.0 are only available from the CRAN archive so users of such versions should adjust the CRAN mirror setting (https://cran-archive.r-project.org) accordingly.
R 4.0.4 'Lost Library Book' released on 2021/02/15
Please check the SHA1 checksum of the downloaded image to ensure that it has not been tampered with or corrupted during the mirroring process. For example type openssl sha1 R-4.0.4.pkg in the Terminal application to print the SHA1 checksum for the R-4.0.4.pkg image. On Mac OS X 10.7 and later you can also validate the signature using pkgutil --check-signature R-4.0.4.pkg
Mac Os X 12 Download
Latest release:
R-4.0.4.pkg (notarized and signed) SHA1-hash: 0b2b3bc846f6ebc72a8bc0b53e6e85d600d95deb (ca. 85MB)R 4.0.4 binary for macOS 10.13 (High Sierra) and higher, signed and notarized package. Contains R 4.0.4 framework, R.app GUI 1.74 in 64-bit for Intel Macs, Tcl/Tk 8.6.6 X11 libraries and Texinfo 6.7. The latter two components are optional and can be ommitted when choosing 'custom install', they are only needed if you want to use the tcltk R package or build package documentation from sources.
Note: the use of X11 (including tcltk) requires XQuartz to be installed since it is no longer part of OS X. Always re-install XQuartz when upgrading your macOS to a new major version. Also please do not install beta versions of XQuartz (even if offered).
This release supports Intel Macs, but it is also known to work using Rosetta2 on M1-based Macs. Native Apple silicon binary is expected for R 4.1.0 if support for Fortran sabilizes, for experimental builds and updates see mac.R-project.org.
Important: this release uses Xcode 12.4 and GNU Fortran 8.2. If you wish to compile R packages from sources, you will need to download GNU Fortran 8.2 - see the tools directory.
NEWS (for Mac GUI)News features and changes in the R.app Mac GUI Mac-GUI-1.74.tar.gz SHA1-hash: 2c791fd1fd2d8f90b0887c1f9541882200a6eab8Sources for the R.app GUI 1.74 for Mac OS X. This file is only needed if you want to join the development of the GUI, it is not intended for regular users. Read the INSTALL file for further instructions. Note: Previous R versions for El Capitan can be found in the el-capitan/base directory.
Binaries for legacy OS X systems:
R-3.6.3.nn.pkg (signed) SHA1-hash: c462c9b1f9b45d778f05b8d9aa25a9123b3557c4 (ca. 77MB)R 3.6.3 binary for OS X 10.11 (El Capitan) and higher, signed package. Contains R 3.6.3 framework, R.app GUI 1.70 in 64-bit for Intel Macs, Tcl/Tk 8.6.6 X11 libraries and Texinfo 5.2. The latter two components are optional and can be ommitted when choosing 'custom install', they are only needed if you want to use the tcltk R package or build package documentation from sources. R-3.3.3.pkg MD5-hash: 893ba010f303e666e19f86e4800f1fbf SHA1-hash: 5ae71b000b15805f95f38c08c45972d51ce3d027 (ca. 71MB)R 3.3.3 binary for Mac OS X 10.9 (Mavericks) and higher, signed package. Contains R 3.3.3 framework, R.app GUI 1.69 in 64-bit for Intel Macs, Tcl/Tk 8.6.0 X11 libraries and Texinfo 5.2. The latter two components are optional and can be ommitted when choosing 'custom install', it is only needed if you want to use the tcltk R package or build package documentation from sources.
Note: the use of X11 (including tcltk) requires XQuartz to be installed since it is no longer part of OS X. Always re-install XQuartz when upgrading your OS X to a new major version.
R-3.2.1-snowleopard.pkg MD5-hash: 58fe9d01314d9cb75ff80ccfb914fd65 SHA1-hash: be6e91db12bac22a324f0cb51c7efa9063ece0d0 (ca. 68MB)R 3.2.1 legacy binary for Mac OS X 10.6 (Snow Leopard) - 10.8 (Mountain Lion), signed package. Contains R 3.2.1 framework, R.app GUI 1.66 in 64-bit for Intel Macs. This package contains the R framework, 64-bit GUI (R.app), Tcl/Tk 8.6.0 X11 libraries and Texinfop 5.2. GNU Fortran is NOT included (needed if you want to compile packages from sources that contain FORTRAN code) please see the tools directory. NOTE: the binary support for OS X before Mavericks is being phased out, we do not expect further releases!
The new R.app Cocoa GUI has been written by Simon Urbanek and Stefano Iacus with contributions from many developers and translators world-wide, see 'About R' in the GUI.
Subdirectories:
toolsAdditional tools necessary for building R for Mac OS X: Universal GNU Fortran compiler for Mac OS X (see R for Mac tools page for details). baseBinaries of R builds for macOS 10.13 or higher (High Sierra)contribBinaries of package builds for macOS 10.13 or higher (High Sierra)el-capitanBinaries of package builds for OS X 10.11 or higher (El Capitan build)mavericksBinaries of package builds for Mac OS X 10.9 or higher (Mavericks build)oldPreviously released R versions for Mac OS X
You may also want to read the R FAQ and R for Mac OS X FAQ. For discussion of Mac-related topics and reporting Mac-specific bugs, please use the R-SIG-Mac mailing list.


Information, tools and most recent daily builds of the R GUI, R-patched and R-devel can be found at http://mac.R-project.org/. Please visit that page especially during beta stages to help us test the Mac OS X binaries before final release!
Package maintainers should visit CRAN check summary page to see whether their package is compatible with the current build of R for Mac OS X.
https://visionfox102.tumblr.com/post/656113628147253248/mac-disk-maker. Binary libraries for dependencies not present here are available from http://mac.R-project.org/libs and corresponding sources at http://mac.R-project.org/src.
Last modified: 2021/02/15, by Simon Urbanek
This is a wide and variant collection of CD-ROM based software, that is, software that came on a CD-ROM for installation on computers, or played in consoles. Ranging from applications and games to gatherings of public-domain software or clip art, the heyday of the CD-ROM is roughly 1989 to 2001. Step1: Insert CD/DVD into CD-ROM, and start/restart computer. Step2: On the black screen, when you are prompted to press any key to boot computer from CD, press any key on the keyboard. After a while your computer will boot from the CD-ROM without setting any things. The main Hiren’s Boot CD file is in ISO format when it is downloaded and one would require a burning software for it such as Windows or Nero that supports this format. Once the burning is done to a CD you need to insert it to your CD-ROM and then start the computer. Ensure that in your BIOS you have set to boot from CD-ROM. How to boot mac from cd. This Mac OS 9.2.2 'boot kit' was made by @that-ben and makes the process of booting (and installing) Mac OS 9 on any G3 and most G4's from an USB stick a little bit easier, because not all the Mac OS 9 install CD images can be used to boot a Mac from an unlocked volume (such as from an USB stick or hard drive).
Since Wamp installs MySQL, all you need to do is set up a user and a database. Click the Wamp icon in the system tray, then go to MySQL » MySQL console. If the console prompts you for a password, just hit Enter. Create a MySQL database. Now you need to create a new MySQL database. You can do this by issuing the following command in the console. Create local mysql database mac. A database in MySQL is implemented as a directory containing files that correspond to tables in the database. Because there are no tables in a database when it is initially created, the CREATE DATABASE statement creates only a directory under the MySQL data directory.
VMware Fusion: Powerfully Simple Virtual Machines for Mac. VMware Fusion Pro and VMware Fusion Player Desktop Hypervisors give Mac users the power to run Windows on Mac along with hundreds of other operating systems, containers or Kubernetes clusters, side by side with Mac applications, without rebooting. Vmware fusion 11.5 crack mac os. VMware Fusion 3 Crack Download, Installer Autodesk Alias Speedform 2018, How To Intsall Techsmith Camtasia Studio 8, AutoDesSys Bonzai 3D Buy Cheap. Vmware Fusion 11, Installer Adobe Audition 3, Keygen For Avid Media Composer 6, Lumion 8.0 Crack.
0 notes
Photo
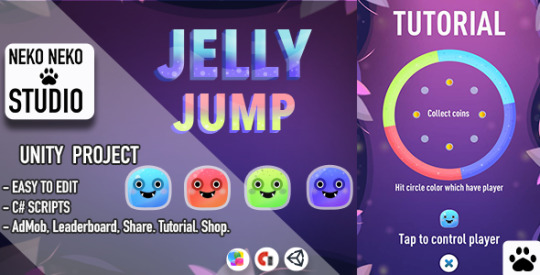
Download Jelly Jump on Codecanyon
Description Jelly Jump :
Download Jelly Jump. The theme releases on Monday 8th March 2021 By The author NekoNekoStudio on Codecanyon. It’s uses with admob,adventure,circle,color,game,jelly,jump,kids,magic,share,sky,soft,space,unity. Item Title: Jelly Jump Category: mobile/ios/games Price: $49 Author: NekoNekoStudio Published Date: Monday 8th March 2021 03:51:06 PM More Info / DownloadDemo
Game for iOS based on Unity 2D engine. IIt’s endless type game, you need tap to player and hit color circle which player painted. Collect coins to bye skins for circles. Enjoy advance, keep your mind! Cool cute design.
The game has a Share function to increase players. Scripts write on C#. Game has AdMob advertation. You can easily add ads in each of the game’s scenes. GameCenter support. Thanks to him, you can maintain a rating between players. A good opportunity for competition between players. Also thanks to this, you can track your achievements in the game. Rate Us. By inserting a link to your proposal, you have the opportunity to receive ratings for your application. The game has settings with which you can turn sounds on and off. Easy to edit and reskin. Just need to change the pictures and you will have a new game.
Requirement: - For launch project and edit it Unity 2019.4.4f1 – For launch Xcode build Version 11.5 (11E608c). - For launch competed game iOS 8.0 or higher. Features: -Share -RateUs -Tutorial -GameCenter -AdMob -Shop -Documentation Instructions: - You can easy change settings all of game process. - Easy for reskin.
- You can contact us for solve your problem.
More Info / DownloadDemo
#admob#adventure#All_Code_amp_plugin#circle#Code_amp_plugin_Weekly_bestsellers#color#game#jelly#jump#kids#magic#mobile#mobile_Weekly_bestsellers#share#sky#soft#space#unity#Weekly_bestsellers
0 notes
Text
Flutter Crash Course for JavaScript Developers

Welcome! I’m glad you’re here again for some more Dart and Flutter magic.
✨ In the previous episode of this series, we looked at Dart and went from basically zero to hero with all those types, classes and asynchrony. I hope you had enough practice on Dart because today, we’ll move forward to Flutter. Let’s get started!
Quick heads up: the “👉” emoji will compare JS and React with Dart and Flutter language examples as of now. Just like in the previous episode,, the left side will be the JS/React, and the right side will be the Dart/Flutter equivalent, e.g. console.log("hi!"); 👉 print("hello!");
What is Flutter, and why we’ll use it
Flutter and Dart are both made by Google. While Dart is a programming language, Flutter is a UI toolkit that can compile to native Android and iOS code. Flutter has experimental web and desktop app support, and it’s the native framework for building apps for Google’s Fuchsia OS.
This means that you don’t need to worry about the platform, and you can focus on the product itself. The compiled app is always native code as Dart compiles to ARM, hence providing you the best cross-platform performance you can get right now with over 60 fps.
Flutter also helps the fast development cycle with stateful hot reload, which we’ll make use of mostly in the last episode of this series.
Intro to the Flutter CLI
When building apps with Flutter, one of the main tools on your belt is the Flutter CLI. With the CLI, you can create new Flutter projects, run tests on them, build them, and run them on your simulators or emulators. The CLI is available on Windows, Linux, macOS and x64-based ChromeOS systems.
Once you have the CLI installed, you’ll also need either Android Studio, Xcode, or both, depending on your desired target platform(s).
(Flutter is also available on the web and for desktop, but they are still experimental, so this tutorial will only cover the Android and iOS related parts).
If you don’t wish to use Android Studio for development, I recommend VSCode. You can also install the Dart and Flutter plugins for Visual Studio Code.
Once you’re all set with all these new software, you should be able to run flutter doctor. This utility will check if everything is working properly on your machine. At the time of writing, Flutter printed this into the console for me:
[✓] Flutter (Channel stable, v1.17.4, on Mac OS X 10.15.4 19E287, locale en-HU) [✓] Android toolchain - develop for Android devices (Android SDK version 29.0.2) [✓] Xcode - develop for iOS and macOS (Xcode 11.5) [!] Android Studio (version 3.5) ✗ Flutter plugin not installed; this adds Flutter specific functionality. ✗ Dart plugin not installed; this adds Dart specific functionality. [✓] VS Code (version 1.46.1) [!] Connected device ! No devices available
You should get similar results for at least for the Flutter part too. Everything else depends on your desired target platforms and your preferred IDEs like Android Studio or VS Code. If you get an X for something, check again if everything is set up properly.
Only move forward in this tutorial if everything works properly.
To create a new Flutter project, cd into your preferred working directory, and run flutter create <projectname>. The CLI will create a directory and place the project files in there. If you use VS Code on macOS with an iOS target, you can use this little snippet to speed up your development process:
# Create a new project flutter create <projectname> # move there cd projectname # open VS code editor code . # open iOS Simulator - be patient, it may take a while open -a Simulator.app # start running the app flutter run
And boom, you’re all set! 💅
If you don’t wish to use the iOS simulator, you can always spin up your Android Studio emulator. Use Genymotion (or any other Android emulation software), or even connect a real device to your machine. This is a slower and more error-prone solution, so I recommend to only test on real devices when necessary.
Once they have booted, you can run flutter doctor again and see if Flutter sees the connected device. You should get an output something just like this:
... [✓] Connected device (1 available) ...
If you got this output - congratulations! 🎉 You’re all set to move on with this tutorial. If, for some reason Flutter didn’t recognize your device, please go back and check everything again as you won’t be able to follow the instructions from now on.
Hello world! 🌍
If you didn’t run the magic snippet previously, run these commands now:
# Create a new project flutter create <projectname> # move there cd projectname # open VS code editor (optional if you use Studio) code . # start running the app flutter run
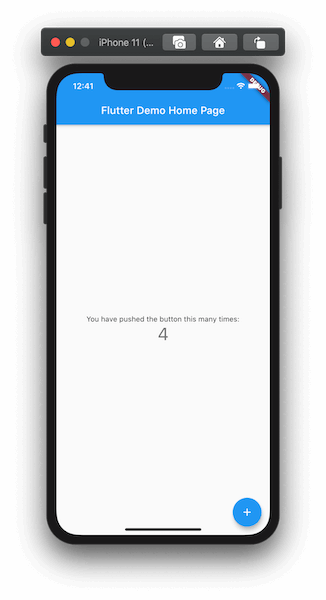
This will spin up the Flutter development server with stateful hot reload and a lot more for you. You’ll see, that by default, Flutter creates a project with a floating action button and a counter:
Once you’re finished with playing around the counter, let’s dig into the code! 👨💻
Flutter project structure
Before we dig right into the code, let’s take a look at the project structure of our Flutter app for a moment:
├── README.md ├── android │ └── ton of stuff going on here... ├── build │ └── ton of stuff going on here... ├── ios │ └── ton of stuff going on here... ├── lib │ └── main.dart ├── pubspec.lock ├── pubspec.yaml └── test └── widget_test.dart
We have a few platform-specific directories: android and ios. These contain the necessary stuff for building, like the AndroidManifest, build.gradle, or your xcodeproj.
At this moment, we don’t need to modify the contents of these directories so we’ll ignore them for now. We’ll also ignore the test directory as we won’t cover testing Flutter in this series (but we may look into it later if there’s interest 👀), so that only leaves us to these:
├── lib │ └── main.dart ├── pubspec.lock ├── pubspec.yaml
And this is where the magic happens. Inside the lib directory, you have the main.dart: that’s where all the code lives right now. We’ll peek into it later, but let’s just have a look at the pubspec.yaml and pubspec.lock.
What are those?

Package management in Flutter - pub.dev
When building a project with JavaScript, we often use third party components, modules, packages, libraries, and frameworks so that we don’t have to reinvent the wheel. The JavaScript ecosystem has npm and yarn to provide you with all those spicy zeroes and ones, and they also handle the dependencies inside your project.
In the Dart ecosystem, this is all handled by pub.dev.
So, just a few quick facts: npm 👉 pub.dev package.json 👉 pubspec.yaml package-lock.json 👉 pubspec.lock
We’ll look into installing packages and importing them into our app in the last episode of this series, in which we’ll create a fun mini-game.
Digging into the Dart code
The only thing left from the file tree is main.dart. main is the heart of our app, it’s like the index.js of most JS-based projects. By default, when creating a project with flutter create, you’ll get a very well documented code with a StatelessWidget, a StatefulWidget, and its State.
So instead of observing the demo code line by line together, I encourage you to read the generated code and comments by yourself and come back here later.
In the next part, we’ll look into what are widgets and the build method.
We’ll learn why it is @overrided, and what’s the difference between stateful and stateless widgets. Then we’ll delete all the code from main.dart and create a Hello world app by ourselves so that you can get the hang of writing declarative UI code in Flutter.
Go ahead, read the generated code and the documentation now! 👀
In Flutter, everything is a widget!
As you have been reading the code, you may have noticed a few things. The first thing after importing Flutter is the entry method I have been talking about in the previous episode:
void main() { runApp(MyApp()); }
And then, you could see all those classes and OOP stuff come back with the line class MyApp extends StatelessWidget.
First things first: in Flutter, everything is a widget! Oh, and speaking of widgets. Components 👉 Widgets!
The StatelessWidget is a class from the Flutter framework, and it’s a type of widget. Another kind of widget is StatefulWidget and we’ll look into the difference between those and how to use them later.
We can create our reusable widget by extending the base class StatelessWidget with our own build method. (By the way, render in ReactJS 👉 build in Flutter). We can see that the build returns a Widget because the return type is defined, and we can see an odd keyword in the previous line: @override.
It’s needed because the StatelessWidget class has a definition for build by default, but we want to replace it (or override it) with our own implementation - hence the keyword @override. Before we dig further into the code, let’s have a peek at using widgets in Flutter:
// using a React component <button onClick={() => console.log(‘clicked!’)}>Hi, I’m a button</button>
// using a Flutter widget RawMaterialButton( onPressed: () { print("hi, i'm pressed"); }, child: Text("press me!"), ),
You can see that Flutter has a different approach with declarative UI code.
Instead of wrapping children between ><s and passing props next to the component name (e.g. <button onClick ...), everything is treated as a property. This enables Flutter to create more flexible and well-typed widgets: we’ll always know if a child is supposed to be a standalone widget or if it can accept multiple widgets as a property, for example. This will come in handy later when we’ll build layouts with Rows and Columns.
Now that we know a bit more about widgets in Flutter, let’s take a look at the generated code again:
@override Widget build(BuildContext context) { return MaterialApp( title: 'Flutter Demo', theme: ThemeData( primarySwatch: Colors.blue, ), home: MyHomePage(title: 'Flutter Demo Home Page'), ); }
The build method returns a MaterialApp that has a type of Widget and - unsurprisingly - comes from Flutter. This MaterialApp widget is a skeleton for your Flutter app. It contains all the routes, theme data, metadata, locales, and other app-level black magic you want to have set up. 🧙
You can see the MyHomePage class being referenced as the home screen. It also has a property, title, set up. MyHomePage is also a widget, and we can confirm that by looking at the definition of this class.
Quick tip: if you are using VSCode as your editor, hold Command and hover or click on the class reference and you’ll be directed to the code of the class.
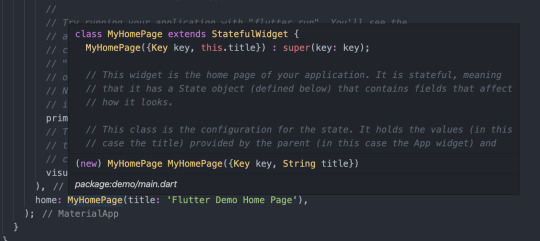
We can see that MyHomePage extends a StatefulWidget. However, the structure of the code itself is a bit squiggly and weird. What’s this MyHomePage({Key key, this.title}) : super(key: key); syntax? Why doesn’t this widget have a build method? What’s a State? What is createState?
To answer these questions, we’ll have to look into one of the more hard-code topics in Flutter: state management.
Local state management in Flutter: StatefulWidgets
I previously talked about the two main types of widgets in Flutter: StatelessWidgets and StatefulWidgets. StatelessWidgets are pretty straightforward: a snippet of code that returns a Widget, maybe some properties are being passed around, but that’s all complexity.
However, we don’t want to write applications that just display stuff! We want to add interactivity! And most interactions come with some state, whether it’s the data stored in an input field or some basic counter somewhere in your app. And once the state is updated, we want to re-render the affected widgets in our app - so that the new data is being displayed for the user.
Think of state management in React: it has the very same purpose with the goal of being as efficient as possible. It’s no different in Flutter: we want to have some very simple widgets (or StatelessWidgets), and some widgets with a bit of complexity and interactivity (or StatefulWidgets).
Let’s dive into the code: a StatefulWidget consists of two main components:
a StatefulWidget (that is called MyHomePage in our case)
a typed State object (that is called _MyHomePageState in this example)
We’ll call these “widget” and “state” (respectively) for the sake of simplicity. The widget itself contains all the props, and a createState overridden method. As you can see, the prop is marked with a final - that’s because you cannot change the prop from within the widget. When you modify a prop of a widget, Flutter throws the current instance away and creates a brand new StatefulWidget.
Note that changing either the prop or the state will trigger a rebuild in Flutter - the key difference between the two is that changing the state can be initiated from within the widget while changing a prop is initiated by the parent widget.
Props help you pass data from parent to children. State helps you handle data change inside the children.
Now, let’s look into changing the state: inside the widget, we have a createState method that only returns the state, _MyHomePageState(). When modifying the state with the setState method, this createState method gets called and returns a new instance of your state. The old instance gets thrown away, and a new instance of your widget will be inserted into the widget tree.
(Sidenote: the widget tree is only a blueprint of your app, the element tree is the one that gets rendered for the user. It’s a bit more advanced, under-the-hood topic, so it won’t be covered in this series - however, I’ll link some video resources later on that will help you understand how Flutter works and what’s the deal with the widget tree and the element tree.)
The _MyHomePageState class has a type of State, typed with MyHomePage.
This is needed so that you can access the properties set in the MyHomePage instance with the widget keyword - for example, to access the title prop, write widget.title. Inside the state, you have an overridden build method, just like you’d see in a typical StatelessWidget. This method returns a widget that renders some nice data, both from props (widget.title) and from the state (_counter).
Notice that you don’t need to type in anything before the _counter. No this.state._counter, no State.of(context)._counter, just a plain old _counter. That’s because from the perspective of the code, this variable is declared just like any other would be:
int _counter = 0;
However, when modifying this variable, we need to wrap our code in setState, like this:
setState(() { _counter++; });
This will tell Flutter that “Hey! It’s time to re-render me!”.
The framework will call the previously discussed createState method; a new instance of your state gets created; built; rendered; and boom! 💥 The new data is now on-screen.
It may seem a bit complicated or seem like you have to write a lot of boilerplate code to get this running. But don’t worry! With VS Code, you can refactor any StatelessWidget into a stateful one with just one click:
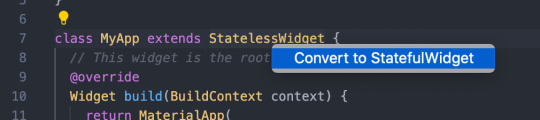
And that’s it for managing your widget’s state! It may be a lot at first, but you’ll get used to it after building a few widgets.
A few notes about global state management in Flutter
Right now, we only looked at working with local state in Flutter - handling app-level, or global state is a bit more complex. There are, just like in JS, tons of solutions, ranging from the built-in InheritedWidget to a number of third-party state management libraries. Some of those may already be familiar, for example, there is RxDart and Redux, just to name a few. To learn more about the most popular solutions, and which one to choose for your project, I suggest you watch this awesome video about global state management in Flutter by Fireship.
Widgets, widgets, and widgets
I already talked about how everything is a widget in Flutter - however, I didn’t really introduce you to some of the most useful and popular widgets in Flutter, so let’s have a look at them before we move on!
Flutter has widgets for displaying texts, buttons, native controls like switches and sliders (cupertino for iOS and material for Android style widgets), layout widgets like Stack, Row, Column and more. There are literally hundreds of widgets that are available for you out of the box, and the list keeps growing.
The whole widget library can be found here in the Widget Catalog, and the Flutter team is also working on a very nice video series with new episodes being released weekly. This series is called Flutter Widget of the Week, and they introduce you to a Flutter widget, it’s use cases, show you code examples and more, in just about one minute! It’s really binge-worthy if you want to get to know some useful Flutter widgets, tips, and tricks.
Here a link for the whole series playlist, and here is the intro episode.
Some useful widgets in Flutter
As you’ll work with Flutter, you’ll explore more and more widgets, but there are some basic Flutter widgets you’ll absolutely need to build your first application. (We’ll probably use most of them in the next and last episode of this series, so stay tuned!)
First and foremost: Text.
The Text widget delivers what its name promises: you can display strings with it. You can also style or format your text and even make multiline texts. (There’s are a lot of line of text-related widgets available, covering your needs from displaying rich text fields to creating selectable texts.)
An example Text widget in Flutter:
Text('hello world!'),
Adding buttons to your Flutter app is also easy as one two three. There are numerous button-related widgets available for you ranging from RawMaterialButton to FlatButton, IconButton, and RaisedButton, and there are also specific widgets for creating FloatingActionButtons and OutlineButtons. I randomly picked 🎲 the RaisedButton for us so that we can have a peek at how easy it is to add a nice, stylish button into our app:
RaisedButton( onPressed: () { print( "hi! it's me, the button, speaking via the console. over.", ); }, child: Text("press meeeeeee"), ),
Building layouts in Flutter
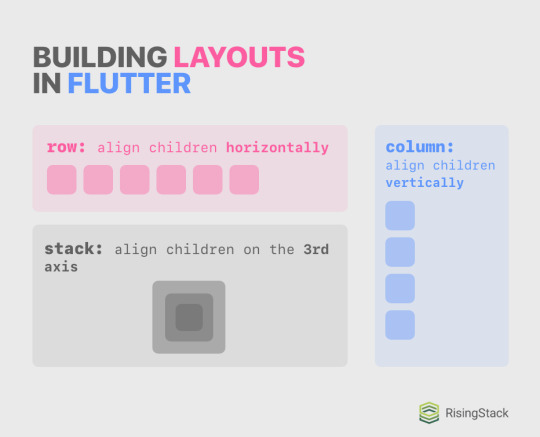
When building flexible and complex layouts on the web and in React-Native, the most important tool you used was flexbox. While Flutter isn’t a web-based UI library and hence lacks flexbox, the main concept of using flexible containers with directions and whatnot is implemented and preferred in Flutter. It can be achieved by using Rows and Columns, and you can stack widgets on each other by using Stacks.
Consider the following cheatsheet I made:
Remember how I previously praised typing the props of a widget and how it’s one of the best tools in Flutter’s declarative UI pattern? The Row, Column and Stack widgets all have a children property that want an array of widgets, or [Widget]. Lucky for you, the VS Code automatically completes the code for you once you start working with these widgets:
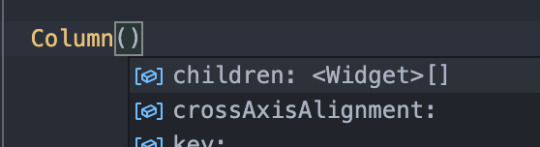
Just hit tab to let Code complete the code for you! Maybe in the future, you won’t need to write code at all, Flutter will just suck out the app idea out of your brain and compile that - but until then, get used to hitting tab.
Let’s look at an example where we display some names underneath each other:
Column( children: <Widget>[ Text("Mark"), Text("Imola"), Text("Martin"), Text("Zoe"), ], ),
You can see that you create a typed list with the <Widget>[] syntax, you pass it as a prop for the Column, create some amazing widgets inside the list, and boom! The children will be displayed underneath each other. Don’t believe me? Believe this amazing screenshot. 📸

Alignment
The real power of Columns and Rows isn’t just placing stuff next to each other, just like flexbox isn’t only about flex-direction either. In Flutter, you can align the children of a Column and Row on two axes, mainAxis and crossAxis.
These two properties are contextual: whilst in a Row, the main axis would be horizontal, and the crossing axis would be vertical, it would be switched in a Column. To help you better understand this axis concept, I created a handy cheat sheet with code examples and more.
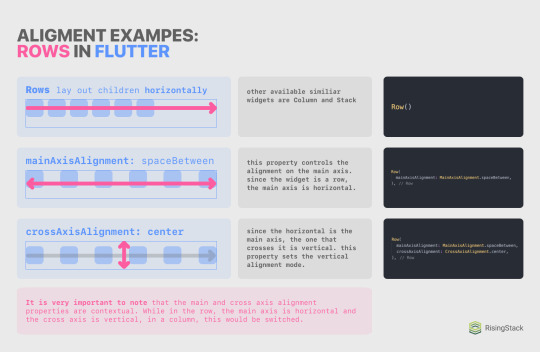
So, for example, if you want to perfectly center something, you’d want to use either the Center widget; or a Row or Column with both mainAxisAlignment and crossAxisAlignment set to .center; or a Row and Column with their mainAxisAlignments set to .center. The possibilities are basically endless with these widgets! ✨
Rendering lists (FlatLists 👉 ListViews)
Whilst thinking about possible use cases for columns, you may have wondered about creating scrollable, dynamic, reorderable, or endless lists.
While these features could be achieved by using Columns, it would take a lot of effort to do so, not even mentioning updating your list data or lazy rendering widgets when there’s a crapton of data. Lucky you, Flutter has a class for rendering lists of data, and it’s called a ListView!
There are several ways to use a ListView, but the most important ones are the ListView(...) widget and the ListView.builder method. Both of them achieve the very same functionality from the perspective of the user, but programmatically, they differ big time.
First, let’s look into the ListView(..) widget. Syntactically, they are very similar to a Column except that they lack the main and cross-axis alignment properties. To continue on with our previous example for columns when we placed names under each other, I’ll display the very same column converted into a ListView:
ListView( children: <Widget>[ Text("Mark"), Text("Imola"), Text("Martin"), Text("Zoe"), ], ),
Tada! 🎉 Your first ListView in Flutter! When refreshing or rebuilding the app (by either pressing a small or capital R in the Flutter CLI), you’ll see the very same thing you saw previously.
However, if you try to drag it, you are now able to scroll inside the container! Note that when a Column has bigger children than its bounds, it will overflow, but a ListView will be scrollable.
ListView builder
While the ListView widget is cool and good, it may not be suitable for every use case. For example, when displaying a list of tasks in a todo app, you won’t exactly know the number of items in your list while writing the code, and it may even change over time. Sure, you are able to run .map on the data source, return widgets as results, and then spread it with the ... operator, but that obviously wouldn’t be performant, nor is it a good practice for long lists. Instead, Flutter provides us a really nice ListView builder.
Sidenote: while working with Flutter, you’ll see the word “builder” a lot. For example, in places like FutureBuilder, StreamBuilder, AnimatedBuilder, the build method, the ListView builder, and more. It’s just a fancy word for methods that return a Widget or [Widget], don’t let this word intimidate or confuse you!
So how do we work with this awesome method? First, you should have an array or list that the builder can iterate over. I’ll quickly define an array with some names in it:
final List<String> source = ["Sarah", "Mac", "Jane", "Daniel"];
And then, somewhere in your widget tree, you should be able to call the ListView.builder method, provide some properties, and you’ll be good to go:
ListView.builder( itemCount: source.length, itemBuilder: (BuildContext context, int i) => Text(source[i]), ),
Oh, and notice how I was able to use an arrow function, just like in JavaScript!
The itemCount parameter is not required, but it’s recommended. Flutter will be able to optimize your app better if you provide this parameter. You can also limit the maximum number of rendered items by providing a number smaller than the length of your data source.
When in doubt, you can always have a peek at the documentation of a class, method, or widget by hovering over its name in your editor:

And that sums up the layout and list-related part of this episode. We’ll look into providing “stylesheets” (or theme data) for your app, look at some basic routing (or navigation) methods, and fetch some data from the interwebs with HTTP requests.
Theming in Flutter
While building larger applications with custom UI components, you may want to create stylesheets. In Flutter, they are called Themes, and they can be used in a lot of places. For example, you can set a default app color, and then the selected texts, buttons, ripple animations, and more will follow this color. You can also set up text styles (like headings and more), and you’ll be able to access these styles across the app.
To do so, you should provide a theme property for your MaterialApp at the root level of the application. Here’s an example:
return MaterialApp( title: 'RisingStack Flutter Demo', theme: ThemeData( // Define the default brightness and colors. brightness: Brightness.light, primaryColor: Colors.green[300], accentColor: Colors.green, // Define button theme buttonTheme: ButtonThemeData( buttonColor: Colors.green, shape: CircleBorder(), ), // Define the default font family // (this won’t work as we won’t have this font asset yet) fontFamily: 'Montserrat', // Define the default TextTheme. Use this to specify the default // text styling for headlines, titles, bodies of text, and more. textTheme: TextTheme( headline1: TextStyle(fontSize: 72.0, fontWeight: FontWeight.bold), headline6: TextStyle(fontSize: 36.0, fontStyle: FontStyle.italic), bodyText2: TextStyle(fontSize: 14.0, fontFamily: 'Muli'), ), ), home: Scaffold(...), );
These colors will be used throughout our app, and accessing the text themes is also simple as a pickle! I added a RaisedButton on top of the app so that we can see the new ButtonThemeData being applied to it:

It’s ugly and all, but it’s ours! 🍋 Applying the text style won’t be automatic, though. As we previously discussed, Flutter can’t really read your mind, so you explicitly need to tag Text widgets as a headline1 or bodyText2, for example.
To do so, you’ll use the Theme.of(context) method. This will look up the widget tree for the nearest Theme providing widget (and note that you can create custom or local themes for subparts of your app with the Theme widget!) and return that theme. Let’s look at an example:
Text( "cool names", style: Theme.of(context).textTheme.headline6, ),
You can see that we are accessing the theme with the Theme.of(context) method, and then we are just accessing properties like it’s an object. This is all you need to know about theming a Flutter app as it really isn’t a complex topic!
Designing mobile navigation experiences
On the web, when managing different screens of the app, we used paths (e.g. fancysite.com/registration) and routing (e.g., react-router) to handle navigating back and forth the app. In a mobile app, it works a bit differently, so I’ll first introduce you to navigation on mobile, and then we’ll look into implementing it in Flutter.
Mobile navigation differs from the web in a lot of ways. Gestures and animations play a very heavy role in structuring out the hierarchy of the app for your user. For example, when a user navigates to a new screen, and it slides in from the right side of the screen, the user will expect to be able to move back with a slide from the left. Users also don’t expect flashy loadings and empty screens when navigating - and even though there are advancements on the web in this segment (e.g. PWAs), it’s by far not the default experience when using websites.
There are also different hierarchies when designing mobile apps. The three main groups are:
Hierarchical Navigation (e.g. the Settings app on iOS)
New screens slide in from left to right. The expected behavior for navigating back is with a back button on the upper left corner and by swiping from the left edge of the screen to the right.
Flat Navigation (e.g. the Apple Music app)
The default behavior for this hierarchy is a tab bar on the bottom.
Tabs should always preserve location (e.g. if you navigate to a subscreen inside on tab one, switch to tab two and switch back to tab one, you’d expect to be on the subscreen, not on the root level screen.)
Swiping between tabs is optional. It isn’t the default behavior and it may conflict with other gestures on the screen itself - be cautious and think twice before implementing swipeable tab bars.
Custom, content-driven, or experimental navigation (Games, books and other content)
When making experimental navigation, always try to be sane with the navigation. The user should always be able to navigate back and undo stuff.
I created a handy cheat sheet for you that will remind you of the most important things when in doubt:
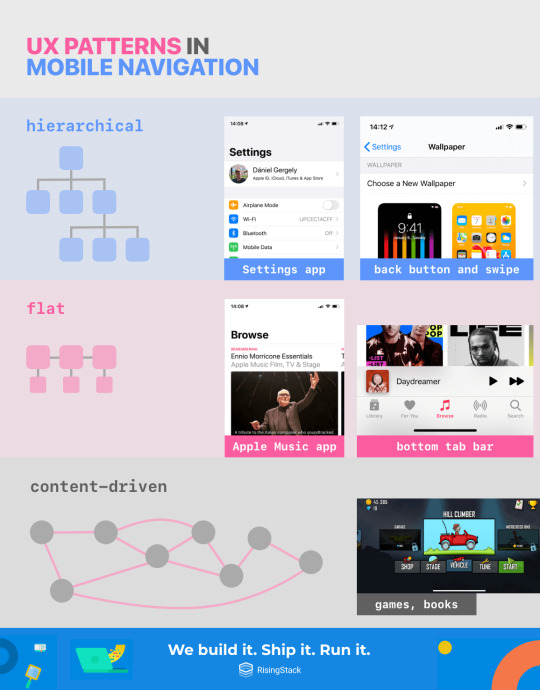
Also, all of these can be mixed together, and other screens like modals can be added to the stack. Always try to KISS and make sure that the user can always navigate back and undo things. Don’t try to reinvent the wheel with navigation (e.g., reverse the direction of opening up a new screen) as it will just confuse the user.
Also, always indicate where the user is in the hierarchy (e.g., with labeling buttons, app title bar, coloring the bottom bar icons, showing little dots, etc.). If you want to know more about designing mobile navigation experiences and implementing them in a way that feels natural to the user, check out Apple’s Human Interface Guideline’s related articles.

Navigation in Flutter
When routing on the web with React or React-Native, you had to depend on third-party libraries to get the dirty work done for you (e.g. react-router). Luckily, Flutter has native navigation capabilities out of the box, and they cover every need of most of the apps, and they are provided to you via the Navigator API.
The applications of this API and the possibilities to play around with navigation are endless. You can, for example, animate a widget between screens; build a bottom navigation bar or a hamburger menu; pass arguments; or send data back and forth. You can explore every navigation-related Flutter cookbook here. In this series, we’ll only look into initializing two screens, navigating between them, and sharing some widgets between them.
To get started with navigation, let’s create two widgets that we’ll use as screens and pass the first into a MaterialApp as the home property:
import 'package:flutter/material.dart'; void main() { runApp(MyApp()); } class MyApp extends StatelessWidget { @override Widget build(BuildContext context) { return MaterialApp( title: 'Flutter Demo', home: ScreenOne(), ); } } class ScreenOne extends StatelessWidget { @override Widget build(BuildContext context) { return Scaffold( body: Center( child: Text("hey! 👋"), ), ); } } class ScreenTwo extends StatelessWidget { @override Widget build(BuildContext context) { return Scaffold( body: Center( child: Text("hi! 👋👋"), ), ); } }
This was easy as a breeze. If you run this app in a simulator, you’ll see “hey! 👋” on the center of the screen. Now, inside the MaterialApp, we can define our routes:
return MaterialApp( title: 'Flutter Demo', home: ScreenOne(), routes: <String, WidgetBuilder>{ '/hey': (BuildContext context) => ScreenOne(), '/hi': (BuildContext context) => ScreenTwo(), }, );
Then, we’ll need something that will trigger the navigation. I’ll add a RaisedButton to the ScreenOne:
return Scaffold( body: Column( mainAxisAlignment: MainAxisAlignment.center, crossAxisAlignment: CrossAxisAlignment.center, children: <Widget>[ Text("hey! 👋"), RaisedButton( child: Text("take me there"), onPressed: () { print("hi!"); }, ), ], ), );
And now, we can navigate the user to the next screen when the button is pressed. Notice that I replaced the Center with a Column with both its main and cross axises centered. This was required because I wanted to have two children underneath each other: a Text and a RaisedButton. Inside the RaisedButton, we only have to push the route to the stack and let Flutter handle the routing and animation:
Navigator.pushNamed(context, '/hi');
By default, we can navigate back to the previous screen by swiping from the left edge of the screen. This is the expected behavior, and we don’t intend to change it, so we’ll leave it as it is. If you want to add a button on the second screen to navigate back to the first screen, you can use Navigator.pop(); method.
Don’t ever push to the same screen the user is on, nor the previous screen. Always use pop when navigating backward.
This will be just enough to cover your basic navigation needs. Don’t forget, if you want to check out more advanced navigation features such as animating widgets between screens or passing data back and forth, check out the related Flutter cookbooks.
Networking, HTTP requests
Now that you can build widgets, layouts, display lists, and you can navigate between screens with Flutter, there’s only one thing left: communicating with your backend API. One of the most popular BaaS providers for mobile and Flutter is Firebase by Google. It allows you to use real-time databases, push notifications, crash reporting, app analytics, and a lot more out of the box. You can find the Flutter Firebase packages on pub.dev or you can follow this step-by-step tutorial.
If you are a more experienced developer and you have a complex project with a custom backend in mind, or if you are just genuinely looking forward to using your own selection of backend APIs - Firebase just won’t suit your needs.
That’s where the http package comes in handy.
Just add it into your dependency list inside the pubspec.yaml, wait until flutter pub get finishes (VSCode automatically runs it for you if it detects changes in the pubspec.yaml), and then continue reading:
dependencies: flutter: sdk: flutter http: any
http is a Future-based library for making HTTP requests. To get started with it, just import it:
import 'package:http/http.dart' as http;
And then, you can start making requests with top-level methods like http.post or http.get. To help you experiment with making HTTP requests in Flutter, I have made a demo API that you can GET on. It will return some names and ages. You can access it here (https://demo-flutter-api.herokuapp.com/people).
Parsing JSON data in Flutter and Dart
After making your GET request on the API, you��ll be able to get data out of it by accessing properties like this:
void request() async { final response = await http.get("https://demo-flutter-api.herokuapp.com/people"); print(response.body); // => [{"name":"Leo","age":17},{"name":"Isabella","age":30},{"name":"Michael","age":23},{"name":"Sarah","age":12}] print(json.decode(response.body)[0]["name"]); // => Leo }
However, this solution should not be used in production. Not only it lacks automatic code completion and developer tooling, but it’s very error-prone and not really well documented. It’s just straight-up crap coding. 💩
Instead, you should always create a Dart class with the desired data structure for your response object and then process the raw body into a native Dart object. Since we are receiving an array of objects, in Dart, we’ll create a typed List with a custom class. I’ll name the class Person, and it will have two properties: a name (with a type of String) and age (int). I’ll also want to define a .fromJson constructor on it so that we can set up our class to be able to construct itself from a raw JSON string.
First, you’ll want to import dart:convert to access native JSON-related methods like a JSON encoder and decoder:
import 'dart:convert';
Create our very basic class:
class Person { String name; int age; }
Extend it with a simple constructor:
Person({this.name, this.age});
And add in the .fromJson method, tagged with the factory keyword. This keyword informs the compiler that this isn’t a method on the class instance itself. Instead, it will return a new instance of our class:
factory Person.fromJson(String str) => Person.fromMap(json.decode(str)); factory Person.fromMap(Map<String, dynamic> json) => new Person( name: json["name"], age: json["age"], );
Notice that I created two separate methods: a fromMap and a fromJson. The fromMap method itself does the dirty work by deconstructing the received Map. The fromJson just parses our JSON string and passes it into the fromMap factory method.
Now, we should just map over our raw response, use the .fromMap factory method, and expect everything to go just fine:
List<Person> listOfPeople = json .decode(response.body) .map<Person>((i) => Person.fromMap(i)) .toList(); print(listOfPeople[0].name); // => Leo
Sidenote: I didn’t use the .fromJson method because we already parsed the body before mapping over it, hence it’s unneeded right now.
There is a lot to unwrap in these few lines! First, we define a typed list and decode the response.body. Then, we map over it, and we throw in the return type <Person> to the map so that Dart will know that we expect to see a Person as a result of the map function. Then, we convert it to a List as otherwise it would be an MappedListIterable.
Rendering the parsed JSON: FutureBuilder and ListView.builder
Now that we have our app up and running with our basic backend, it’s time to render our data. We already discussed the ListView.builder API, so we’ll just work with that.
But before we get into rendering the list itself, we want to handle some state changes: the response may be undefined at the moment of rendering (because it is still loading), and we may get an error as a response. There are several great approaches to wrap your head around handling these states, but we’ll use FutureBuilder now for the sake of practicing using new Flutter widgets.
FutureBuilder is a Flutter widget that takes a Future and a builder as a property. This builder will return the widget we want to render on the different states as the Future progresses.
Note that FutureBuilder handles state changes inside the widget itself, so you can still use it in a StatelessWidget! Since the http package is Future-based, we can just use the http.get method as the Future for our FutureBuilder:
@override Widget build(BuildContext context) { return Scaffold( body: FutureBuilder( future: http.get("https://demo-flutter-api.herokuapp.com/people"), ), ); }
And we should also pass a builder. This builder should be able to respond to three states: loading, done and error. At first, I’ll just throw in a centered CircularProgressIndicator() to see that our app renders something:
return Scaffold( body: FutureBuilder( future: http.get("https://demo-flutter-api.herokuapp.com/people"), builder: (BuildContext context, AsyncSnapshot<http.Response> response) { return Center( child: CircularProgressIndicator(), ); }, ), );
If you run this app, you’ll see a progress indicator in the center of the screen running indefinitely. We can get the state of the response by the response.hasData property:
builder: (BuildContext context, AsyncSnapshot<http.Response> response) { if (response.hasData) { // loaded! } else if (response.hasError) { // error! return Center( child: Text("error!"), ); } else { // loading... return Center( child: CircularProgressIndicator(), ); } },
And now, we can be sure that nothing comes between us and processing, then rendering the data, so inside the response.hasData block, we’ll process the raw response with previously discussed parsing and mapping method, then return a ListView.builder:
// loaded! List<Person> listOfPeople = json .decode(response.data.body) .map<Person>((i) => Person.fromMap(i)) .toList(); return ListView.builder( itemCount: listOfPeople.length, itemBuilder: (BuildContext context, int i) => Text( "${listOfPeople[i].name} (${listOfPeople[i].age})", ), );
And that’s it! 🎉 If you run this snippet right now, it will render four names and their corresponding ages next to them. Isn’t this amazing? It may have seemed like a lot of work for a simple list like this, but don’t forget that we created a whole-blown class, parsed JSON, and converted it into class instances, and we even handled loading and error states.
Summing it all up
Congratulations on making it this far into the course! You have learned a lot and came along a long way since we started in the previous episode.
You went from zero to hero both with Dart (types, control flow statements, data structures, OOP, and asynchrony) and Flutter (CLI, widgets, alignment, lists, themes, navigation and networking).
This really has been a lot of work, and you’ll still have to learn a lot until you get fluent in Flutter, but in the end, the only thing that will matter is the result of your hard work. And that’s what we’re going to harvest in the next and last episode of this Flutter series: we’ll build a fun mini-game with Flutter! 🎲
I’m really looking forward to seeing you here next week. Until then, stay tuned, and happy Fluttering! ✌️
All the bests, 🍻 Daniel from RisingStack
Flutter Crash Course for JavaScript Developers published first on https://koresolpage.tumblr.com/
0 notes
Text
xcodes - Xcodeのバージョン管理ツール
from http://www.moongift.jp/2020/08/xcodes-xcode%e3%81%ae%e3%83%90%e3%83%bc%e3%82%b8%e3%83%a7%e3%83%b3%e7%ae%a1%e7%90%86%e3%83%84%e3%83%bc%e3%83%ab/
Xcodeは最新のものを使うのが基本ですが、場合によっては古いバージョンを使わないといけないこともあります。さらに最新といってもベータと共存させて新しいiOS向けの開発と同時にこれまでのものをメンテナンスする機会も多いです。
そんな様々なバージョンが混在するXcode環境を効率的に管理できるのがxcodesです。
xcodesの使い方
listコマンドでインストールできるXcodeがリストアップされます。
$ xcodes list 2.3 2.4 : 11.5 (Installed, Selected) 11.6 Beta 12.0 Beta 12.0 Beta 2 (12A6163b) 12.0 For Macos Universal Apps Beta 12.0 For Macos Universal Apps Beta 2
インストールはバージョンを指定して行います。
$ xcodes install 12.0 Beta 2 (1/6) Downloading Xcode 12.0.0-beta.2+12A6163b: 5%
xcodesはよくあるプログラミング言語のバージョン管理ツールに似ています。ダウンロードされるサイズは比較になりませんが、xcodesを使えば運用が楽になるでしょう。
xcodesはSwift製のオープンソース・ソフトウェア(MIT License)です。
RobotsAndPencils/xcodes: Manage the Xcodes installed on your Mac
0 notes
Text
Swift 4 - Learn to Code with Apple's New Language
Swift 4 – Learn to Code with Apple’s New Language
Learn to Program Swift 4 with Xcode Playgrounds. Be a part of the world’s fastest growing programming language! iOS 11
Have you ever wanted to try out programming? Have you tried to learn Swift, only to get fed up with incomplete YouTube tutorials and poorly written tutorials? Looking to move your code from Swift 3 to 4?
THIS IS THE COURSE FOR YOU!
Includes:
11.5 hours on-demand video
3…
View On WordPress
#Apple#Bestselling#Development#iOS Development#Learn to Program#Popular#Programming Languages#Swift4
7 notes
·
View notes
Text
Apple Releases iOS Beta With First Version of COVID-19 Contract Tracing App
Apple has just released a new beta of iOS 13.5 Thursday, Apr. 30, including the first version of its exposure notification API for COVID-19 contact tracing. The beta is available to developers now, along with the first beta launch of Xcode 11.5. The Xcode launch includes an up to date version of the iOS SDK that consists of the publicity notification API.

In conjunction with this, 9to5Mac said Apple and Google could also release the first seeds of the exposure notification API to public health authority developers. Their goal is to acquire feedback from builders on how to improve the API before its launch by May.
Apple is relating to this iOS launch as beta 3 of iOS 13.5, following two developer beta releases of iOS 13.4.5. 9to5Mac explained any revision of iOS that makes use of a new SDK should have its minor model wide variety changed, therefore the leap from iOS 13.4.5 to iOS 13.5.
Apple and Google will release additional data to developers, TechCrunch reported. This will include sample code to help builders similarly recognize how the exposure notification app will work.
Later this year, iOS and Android will receive updates to allow users to decide into exposure notification without installing an app.
Apple and Google also said that they've already received feedback from the public health officials and feature made adjustments to the API in response. For example, today's update allows developers to define and calculate an exposure risk level to expose to users. This will allow the government to make more specific facts about the exposure, including distance and duration.
How exposure notification app will work
In the Google-Apple device, tracing the coronavirus is done through scrambled codes that are saved on a user's mobile phone. CNBC said the organizations and security advocates prefer this method to prevent the possibility that coronavirus-tracing apps ought to shape the cornerstone of the latest surveillance systems.

When two people are in close range, with proximity detected by using Bluetooth, their phones will detect anonymous identifiers. If an individual gets COVID-19, they can have their device transmit a listing of all of us they've been in contact with to the cloud.
The second person's telephone will periodically download a list of anybody that has tested fine of their area. If a suit occurs, they'll be notified and brought on to contact health authorities.
What are the other updates?
Apple's latest beta model of iOS 13 makes it easier to unlock an iPhone with Face ID feature while wearing a face mask, The Verge reported.
The report added iOS will now pull up the manual passcode option after one swipe up from the bottom of the screen. The change - which should finally arrive in the non-beta iOS release - can be a welcome development for any iPhones without a physical home button.
Build your next iOS mobile app hiring the best mobile app developers from an award-winning iOS app development company- QSS Technosoft! Backed up by a team of 200+ mobile app developers, we have, till now, developed a number of iOS apps suiting client’s requirements. Our iOS app developers keep themselves updated of the latest versions released and deliver scalable iOS apps across multiple business domains from healthcare to logistics to sports & education. Let’s connect for a free consultation about your project!
Source: This news was first published in
9 to 5 MAC
.
0 notes
Photo

Apple lanza la quinta beta de macOS Catalina y la versión 11.5 de Xcode https://www.applesfera.com/os-x/apple-lanza-quinta-beta-macos-catalina-version-11-5-xcode
0 notes
Photo

آبل تُطلق الإصدار التجريبي من iOS 13.5 يتضمن واجهة برمجة التطبيقات الخاصة بتتبع فيروس كورونا https://ift.tt/2Sl1ZRw
أصدرت آبل إصدارًا تجريبيًا جديدًا من نظام تشغيل iOS 13.5 يوم أمس، يحتوي على الإصدار الأول من واجهة برمجة التطبيقات الخاصة بإشعار التعرض لتتبع جهات الاتصال المصابة بفيروس كورونا COVID-19. الإصدار التجريبي مُتاح للمطورين الآن إلى جانب الإصدار التجريبي الأول من Xcode 11.5. يتضمن إصدار Xcode إصدارًا مُحدّثًا من iOS SDK وهو الذي يشتمل على واجهة برمجة تطبيقات إشعار التعرض.
بالتزامن مع هذا، يقول مُمثلو آبل وجوجل أنهم يطلقون أيضًا البذور الأولى من واجهة برمجة تطبيقات إشعار التعرض لفيروس كورونا. وتقول الشركتان الآن أن الهدف هو جمع التعليقات والملاحظات من المطورين بشأن كيفية تحسين واجهة برمجة التطبيقات قبل إصدارها في منتصف مايو.
وفي الوقت نفسه، أصدرت جوجل أيضًا إصدارًا تجريبيًا جديدًا من خدمات Google Play مع واجهة برمجة تطبيقات إشعار التعرض للفيروس ومجموعة SDK للمطورين.
في يوم الجمعة الموافق 1 مايو، قال ممثلو آبل وجوجل أن الشركتين ستقومان بنشر معلومات إضافية للمطورين. سيتضمن هذا نموذجًا من التعليمات البرمجية لمساعدة المطورين على فهم كيفية عمل نظام إشعار التعرض للفيروس بشكل أكبر.
كما أن آبل لا تطلق واجهة برمجة تطبيقات إشعار التعرض لجميع المطورين، بل إلى سلطات الصحة العامة فقط. كما ستتم إضافة المزيد من هؤلاء المطورين إلى الإصدار التجريبي الخاص بعملية الاختبار.
كتذكير، إليك كيفية عمل هذه التقنية الجديدة من قِبل آبل:
عندما يكون شخصان في مسافة قريبة، مع اكتشاف القرب بواسطة البلوتوث، فستتبادل هواتفهما معرفات ID مجهولة. إذا تم تشخيص إصابة الشخص بـ COVID-19، فهذا يجعل أجهزته ترسل قائمة بجميع الأشخاص الذين كانوا على اتصال بهم سحابيًّا.
هاتف الشخص الثاني سيُنزّل بشكل دوري قائمة بجميع الأشخاص الذين ثبتت إصابتهم بالفيروس في منطقتهم. وفي حالة حدوث تطابق، سيتم إعلامهم ومطالبتهم بالاتصال بالسلطات الصحية.

pic.twitter.com/WkmFtLDgVc
— Guilherme Rambo (@_inside) April 29, 2020
The post آبل تُطلق الإصدار التجريبي من iOS 13.5 يتضمن واجهة برمجة التطبيقات الخاصة بتتبع فيروس كورونا appeared first on عالم آبل.
0 notes
Text
Week 332
Happy Thursday! Apple released what’s referred to as the first beta of iOS 13.5, after the two beta versions of iOS 13.4.5. It contains, besides improvements and fixes, the first preview of the contact tracing API that it’s developing together with Google. Being a new API, this means the minor version had to be increased, so we we got iOS 13.5 Beta 3. And because of this, we also got Xcode 11.5.
Marius Constantinescu
Articles
Protocol-Oriented Programming, by @scotteg
Converting a project to SwiftUI, by @sergioestevao
Controlling Lottie Animation with Markers, by @Lee_Kah_Seng
Apple conference at the time of Covid-19, by @theillbo
The magic of fixed size modifier in SwiftUI, by @mecid
History of Auto Layout constraints, by @sarunw
Combine playgrounds by @DenisPoifol
Discovering which DispatchQueue a method is running on, by @rockbruno_
Practicing the Coding Challenges, by @brentsimmons
Tools/Controls
PIPWKit - Picture in Picture Window for iOS, by @g8production
RocketSim: Enhancing the iOS Simulator for productivity, by @twannl
Podcasts
“Polymorphic interfaces” with special guest Dave Abrahams, with @DaveAbrahams, @johnsundell
Videos
Swift News, by @seanallen_dev
Credits
scotteg, pmusolino, LeeKahSeng, cupnoodle, DenisPoifol, mecid, sarunw
0 notes
Text
Apple y Google lanzan las primeras betas de sus APIs para notificación de exposición a coronavirus
#Noticias
El pasado miércoles 29 de abril, Apple y Google compartirán las betas de sus APIs de notificación a exposición a COVID-19 con un grupo selecto de desarrolladores involucrados con autoridades de salud pública en todo el mundo.
Apple publicará la primera beta de Xcode 11.5, un prelanzamiento de las herramientas para desarrolladores que integrarán una nueva versión del SDK para…
View On WordPress
0 notes
Link
Apple jette les bases de l'API de notification d'exposition aux coronavirus dans iOS 13.5 Beta 3 et New Xcode 11.5 Beta
0 notes
Photo

Apple libera la Golden Master de iOS 13.5, iPadOS 13.5 y Xcode 11.5 https://www.applesfera.com/ios/apple-libera-quinta-beta-ios-13-5-ipados-13-5
0 notes
Text
Simulate APNS Remote Notification on simulator iOS 13.5 and above | Xcode 11.5
Simulate APNS Remote Notification on simulator iOS 13.5 and above | Xcode 11.5
Hi EveryOne!
In this Swift tutorial. I discussed about how to trigger a push notification to Simulator iOS 13.5 and above | Xcode 11.5 and above.
No Certificate. No ProvisioningProfile. No Third party websites. No .p12 file required.
Terminal command to send Push notification to simulator.
Syntex:
$ xcrun simctl…
View On WordPress
#APNS#Code with kathir#Code with kathiresan#Code with ktrkathir#Ios#iOS 13.5#iOS APP#kathir#kathiresan#kathiresan murugan#KathiresanMurugan#ktr kathir#ktrakathir#ktrkathir#Push#PushNotification#RemoteNotification#simulator#step by step#swift#swift 5.2#Video tutorial#Xcode#Xcode 11#Xcode 11.5#YouTube
0 notes
Link
Apple jette les bases de l'API de notification d'exposition aux coronavirus dans iOS 13.5 Beta 3 et New Xcode 11.5 Beta
0 notes